
Solar Panel Bird Proofing Kit: The Installer's Tools and Components Checklist
- Jun 9
- 5 min read
A well-assembled solar panel bird proofing kit is the difference between a retrofit that takes a calm morning and one that turns into a string of trips back to the van. When the right components, hand tools and access gear are staged before the first climb, a pitched-roof array gets protected quickly, the working-at-height risk stays low, and the customer handover is signed without a second visit. This article is a practical, affiliate-free checklist of everything an installer actually needs to fit bird protection on a pitched-roof PV system — what goes in the kit, what stays in the van, and what you can safely leave at the depot.
The checklist assumes a pitched-roof photovoltaic array. PV Protector® is engineered for pitched-roof modules with a defined lower module edge; it does not fit flat-roof ballasted systems, ground-mount, or open-field PV. If the array is flat-roof, ballasted, or ground-mounted, this is the wrong product and the wrong kit for the job.
What Goes Into a Solar Panel Bird Proofing Kit
The core of the solar panel bird proofing kit is not a long bill of materials — it is three engineered components that work together. Getting the right variant of each is what makes the job tool-free on the roof.
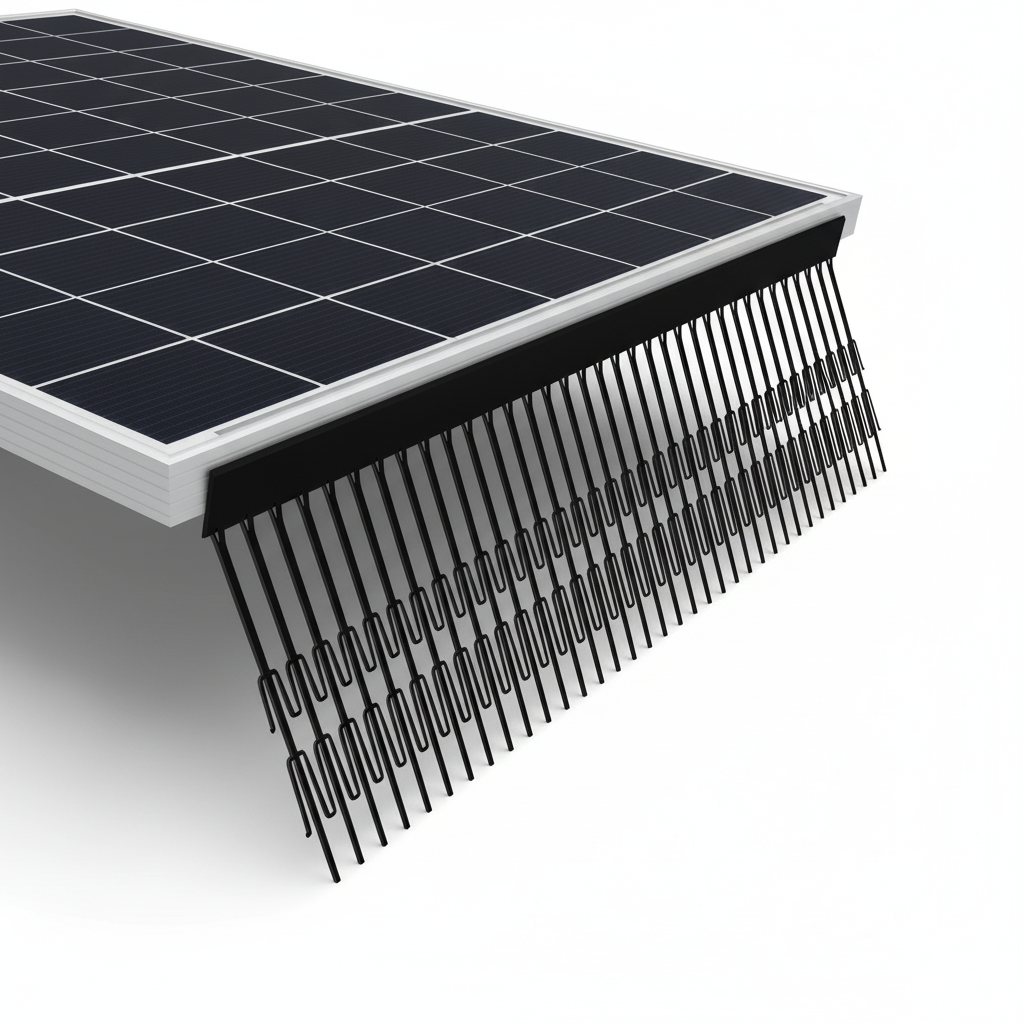
- Perimeter Segments. These close the gap under the lower module edge so birds cannot get beneath the array to nest. They are produced in two heights — 150 mm (Standard) and 200 mm (Extended) — chosen to bridge the gap between the lower module edge and the roof covering. The Perimeter Segment is HDPE with UV stabilisers 944 and 622, so it holds up to years of sun and weather on an exposed roof. - C-Clips. The C-Clip snaps the Perimeter Segment onto the module frame with no drilling. A single clip covers 30, 35 and 40 mm module frame heights, so one SKU fits almost every current European module. The C-Clip is moulded from UV-stabilised PC+ABS for long outdoor life. - Cable Ties. Used to keep DC cabling clear of the protected line as you work, the Cable Tie is UV-stabilised PA66 — the same weather-resistant grade philosophy as the rest of the system, not a generic indoor tie.
Quantities come straight off the survey: the total perimeter per array section sets how many linear metres of Perimeter Segment and how many C-Clips you stage. Confirm the actual module frame height on the array before you commit to a clip size.
The Tools You Actually Need on the Roof
Because the components are designed to position-and-snap, the on-roof tool list is deliberately short. The roof lead's hands should be free to work, not loaded with hardware.

- A pair of snips or fine-tooth shears for trimming a Perimeter Segment to length where a run ends or turns a corner. - A tape measure to confirm a run against the cut list before trimming. - A marker for quick reference points on long runs. - A belt pouch holding a short supply of C-Clips and Cable Ties so material is always to hand.
That is genuinely the whole on-roof kit. There is no drill, no impact driver, no adhesive gun and no per-panel bracket to sort — the C-Clip does the fixing.
Survey and Measuring Tools — Before the Kit Goes Up
A clean install is mostly won on the survey, not the roof. The numbers that drive the whole job are the module frame height, the lower-edge gap, and the total perimeter per array section. Carry the tools that capture them reliably.
- A folding rule or calliper to read the module frame height precisely — 30, 35 or 40 mm — rather than guessing it from the ground. - A tape or laser measure for the perimeter and the lower-edge gap, which decides whether the 150 mm or 200 mm Perimeter Segment is correct. - A phone or tablet for before-photos and to log the measurements straight into the job file.
If those numbers are not captured first, the right kit cannot be staged. For the full method, see the practical installer guide linked below.
Access and Safety Equipment
Most national regulators treat rooftop PV work as work at height, and the access kit is not optional. The UK Health and Safety Executive guidance on working at height and equivalent bodies across the EU point the same way: plan access before anyone climbs.
- Rope access kit or scaffold, with verified anchor points and a rescue plan agreed before the first climb. - A harness and lanyard appropriate to the roof, inspected and in date. - Roof ladders or a crawl board to spread load on tiled or slate coverings. - Edge protection where the job and the roof call for it.
A second person on site is the safer default for rooftop work, not a luxury — for rescue readiness and for the steady material flow that keeps the roof lead in position.
The Ground-Level Cut Station
The unsung part of the solar panel bird proofing kit lives on the ground. A simple cut station lets one person trim Perimeter Segments to the lengths called from the roof, so the person above never breaks position to fetch material.
- A stable bench or trestle at a comfortable working height. - The cut list from the survey, converting the surveyed perimeter into pre-planned lengths. - Snips and a spare supply of Cable Ties kept at the station. - A tidy offcut box so the working area stays clear.
Staging the cuts on a plan rather than guessing on the day is what turns a fiddly retrofit into a smooth, repeatable pass — and it pairs naturally with keeping the DC cabling tidy as you go.
What You Don't Need — and Why
Half of a good kit is knowing what to leave at the depot. The PV Protector® system is deliberately built so the following never join the bird proofing kit:
- No drill or fixings into the module frame. Drilling a module frame can void the module warranty; the tool-free C-Clip removes the need entirely. - No adhesives or sealants. Nothing is glued to the modules or the roof, so there is no cure time and no residue to manage. - No per-panel brackets. One clip family fits 30, 35 and 40 mm frames, so there is no box of mixed hardware to sort at height.
Leaving these out is not a compromise — it is the design. The reason the whole job is position-and-snap is the engineered components behind it: PV Protector® Perimeter Segments (HDPE with UV stabilisers 944 and 622), C-Clips (UV-stabilised PC+ABS) and Cable Ties (UV-stabilised PA66). One short survey, one staged van, and the array is protected for the long term, backed by the 10-year warranty stated in the manufacturer specification.
To build your standard bird proofing kit around these components, or to discuss installer-partner conditions and stocking through your distributor, talk to the PV Protector® team. And before your next retrofit, review the common first-time installation mistakes so your kit and your crew avoid them from day one.

Comments