
Solar Panel Bird Mesh Installation: Common First-Time Mistakes to Avoid
- Apr 10
- 4 min read
Installing bird protection on photovoltaic systems is a straightforward process — but only when done correctly from the start. For solar panel bird mesh installation tips that prevent costly callbacks, first-time installers need to understand where the most frequent errors occur and how to avoid them. Whether fitting PV Protector® on a new residential system or retrofitting an existing rooftop array, a clean first installation sets the standard for every job that follows.
Solar Panel Bird Mesh Installation: Underestimating Site Assessment and Preparation
One of the most common bird protection mesh solar panel mistakes happens before the mesh is even unpacked. Installers who skip a thorough site assessment often encounter problems mid-installation that could have been identified in advance.
The key preparation steps include measuring the full perimeter of the PV array accurately, checking for existing nesting material beneath modules, and inspecting the panel frame profile for compatibility with clip-based mounting systems. Bird nesting debris — twigs, feathers, droppings — must be cleared completely before fitting any barrier. Residual nesting material left beneath panels traps moisture against mounting hardware, accelerating corrosion and undermining the protection system from day one.
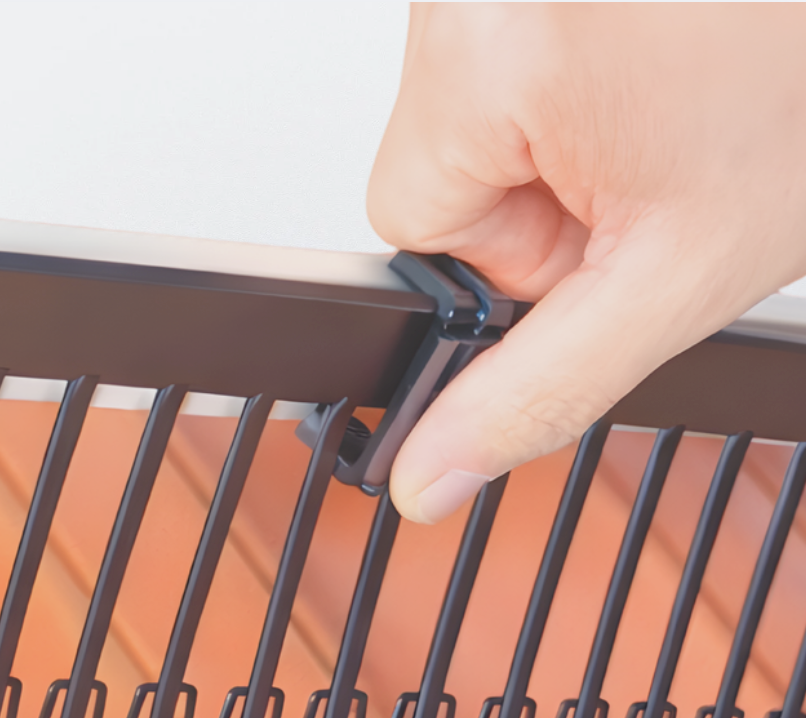
Frame profile assessment matters because not all modules have identical edge geometries. PV Protector® C-clips are designed to fit standard aluminium PV module frames without drilling or adhesive, but verifying compatibility before starting avoids interruptions. Experienced installers now include bird protection assessment as part of their standard PV inspection workflow.
Incorrect Mesh Fitting and Clip Spacing

The second category of first time bird mesh installation solar errors relates to the physical fitting process. Two mistakes dominate: leaving gaps at mesh segment joints and spacing C-clips too far apart.
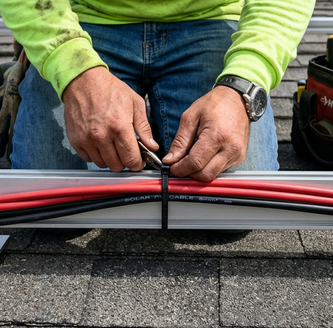
Gaps at connection points are the single most common installation failure. Birds — particularly pigeons and starlings — need surprisingly little space to access the area beneath solar panels. A gap of just 25 mm at a mesh joint is sufficient for a starling to push through. Every joint between mesh segments must be secured with UV-resistant cable ties, and the mesh must sit flush against the panel frame perimeter without buckling or sagging.
Clip spacing is equally critical. When installing bird guard on a PV system, clips placed too far apart allow the mesh to flex outward under wind load, creating entry points over time. The recommended approach is to position C-clips at regular intervals along the full frame perimeter, maintaining consistent tension across each mesh segment. This applies equally to tool-free bird mesh PV modules installations on both pitched and flat roof configurations.
For installers new to bird exclusion work, reviewing a real-world retrofit case study can illustrate what a complete, gap-free installation looks like in practice.
Overlooking Ventilation and Long-Term Maintenance Access
A third area where PV system bird exclusion best practices are often missed involves ventilation and serviceability. The mesh barrier must prevent bird access while still allowing adequate airflow beneath the modules. Blocked ventilation increases panel operating temperature, which reduces energy output and accelerates module degradation — precisely the problem bird protection is meant to prevent.
PV Protector® HDPE mesh is specifically designed with this balance in mind. The UV-stabilised mesh material maintains structural integrity over the system lifetime while its open structure preserves the natural convective airflow beneath modules. However, installers must ensure the mesh is not compressed or doubled over at corners, as this restricts airflow at the points where heat tends to accumulate most.
Maintenance access is the other frequently overlooked factor. Experienced installers position the mesh system so that individual sections can be removed and refitted when panel servicing or inverter access is required. A solar panel pigeon mesh fitting guide should always account for future O&M requirements — not just the initial installation. Planning for maintenance access from the start is one reason many professionals now include bird protection as standard in every installation.
Getting It Right the First Time
First-time bird protection installation does not need to be complicated. The complete PV Protector® kit — mesh segments, C-clips, and UV-resistant cable ties — is designed for a single installer working without specialist tools. The most common mistakes are not technical failures but preparation oversights: skipping the site check, rushing the clip spacing, or forgetting about long-term access.
For a detailed walkthrough of the full installation process, visit the PV Protector® installation guide and ensure every first installation meets the same professional standard as your hundredth.
Frequently Asked Questions
What are the most common mistakes when installing bird mesh on solar panels for the first time?
The most frequent errors include inadequate site preparation (failing to remove existing nesting material), leaving gaps at mesh segment joints, spacing mounting clips too far apart, and not accounting for ventilation requirements. Each of these can be avoided with a systematic pre-installation assessment and careful attention to clip placement and mesh tension during fitting.
How do I ensure bird protection mesh does not void my solar panel warranty?
Clip-based mounting systems like PV Protector® attach directly to the panel frame without drilling, adhesive, or any modification to the module structure. This non-invasive approach means the solar panel manufacturer warranty remains unaffected. Always verify that your chosen mounting method requires no frame penetration or structural alteration.
Can bird mesh be installed on existing solar panel systems as a retrofit?
Yes. Bird protection mesh can be fitted to existing PV installations as a retrofit. The process follows the same principles as new-build installation: clear any nesting debris, assess frame compatibility, measure the array perimeter, and fit mesh segments with clips at regular intervals. Retrofit installations may require additional cleaning time if significant nesting material has accumulated.

Comments