PV System Maintenance: The Professional Installer's Complete Guide
- 2 days ago
- 6 min read
Photovoltaic systems are engineered for decades of service, but their longevity depends on structured preventive care. For professional installers, PV system maintenance represents both a responsibility to clients and an opportunity to build recurring revenue streams through O&M contracts.
This guide outlines inspection schedules, performance monitoring protocols, and preventive maintenance strategies that protect long-term yield while minimising callback risk.
<!-- IMAGE: slot=hero hint="professional installer inspecting solar panel array on pitched roof, maintenance workflow" -->
Why PV System Maintenance Matters
A well-maintained photovoltaic array delivers predictable output over its 25–30 year service life. Conversely, neglected systems suffer from:

- Accelerated performance degradation beyond the expected 0.5–0.8% annual rate - Undetected faults that compound into costly failures - Warranty claims rejected due to lack of documented inspection - Fire risk from cable abrasion or debris accumulation in module perimeters - Soiling losses of 3–6% annually in urban and agricultural environments
According to Fraunhofer ISE's Photovoltaics Report, professionally maintained PV systems show 12–18% higher lifetime energy yield compared to unmaintained arrays — a difference that directly impacts investor return and client satisfaction. IRENA's Renewable Power Generation Costs data further confirms that O&M represents a critical component of levelised cost calculations.
Core Maintenance Categories
1. Visual Inspection
The foundation of any PV system maintenance programme is systematic visual assessment. This requires no specialised equipment and can be performed quarterly or bi-annually depending on system size and environment.
What to check:
- Module surface condition: cracks, discolouration, delamination - Frame integrity: corrosion, mechanical stress, mounting clip engagement - Cable routing: abrasion points, UV damage, exposure to wildlife - Junction boxes: seal integrity, moisture ingress, corrosion - Perimeter protection: mesh continuity, clip engagement, debris accumulation - Inverter condition: error codes, ventilation blockage, dust build-up - DC isolators: switch integrity, arcing marks, weathering
<!-- IMAGE: slot=section hint="close-up of solar panel frame showing inspection points, cable management" -->
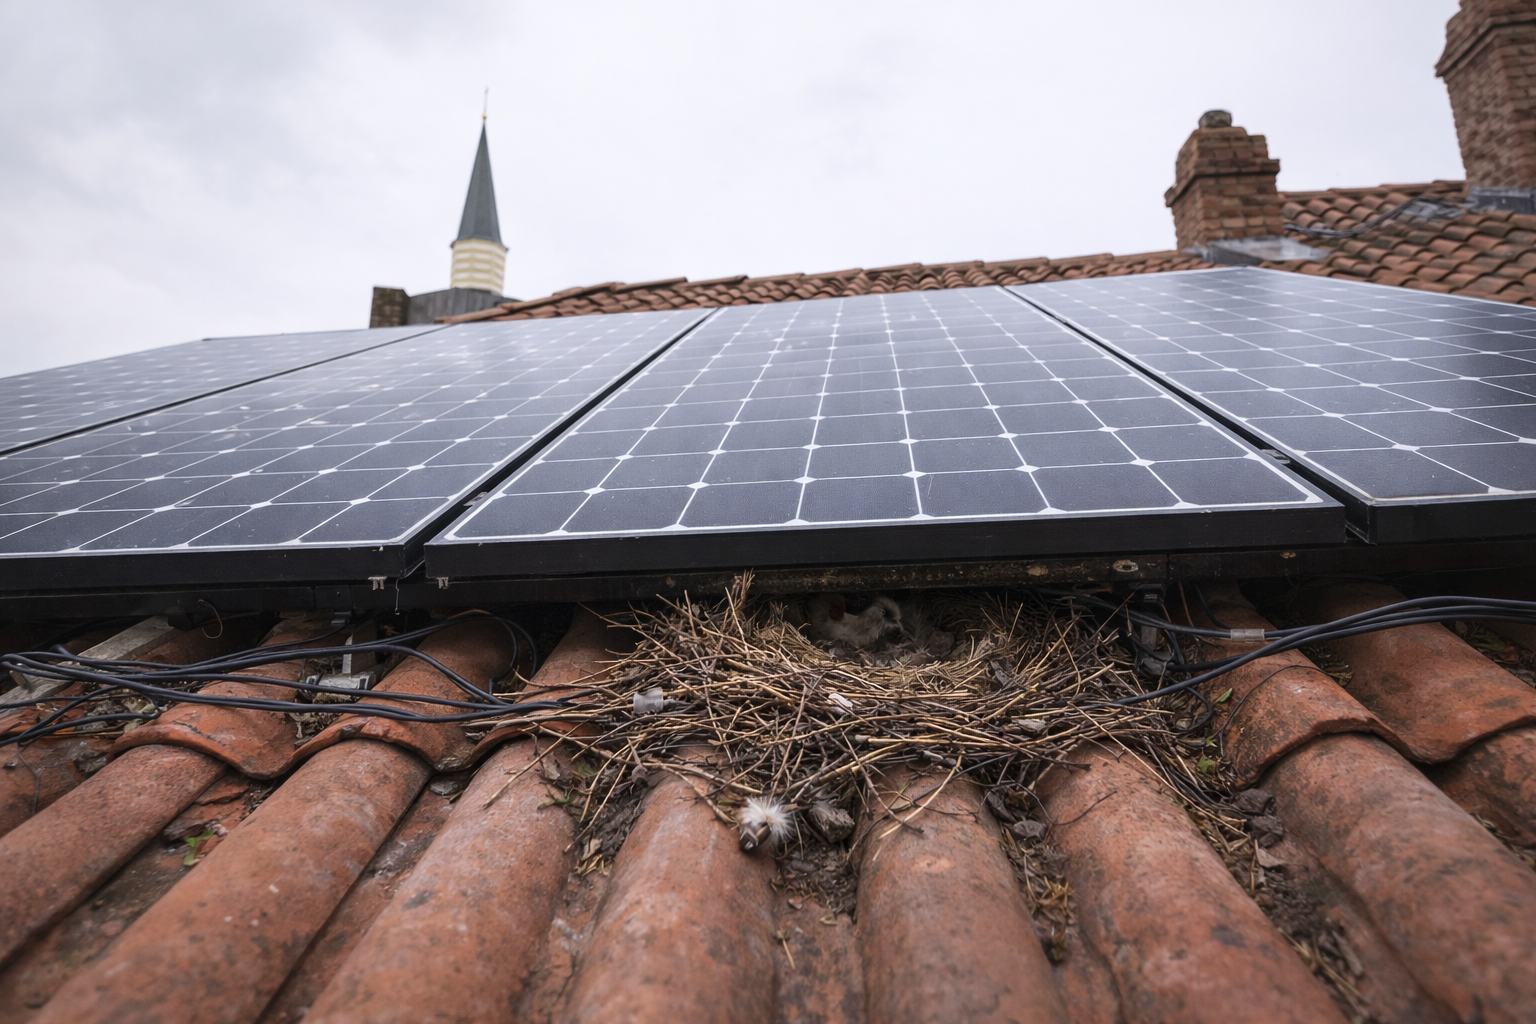
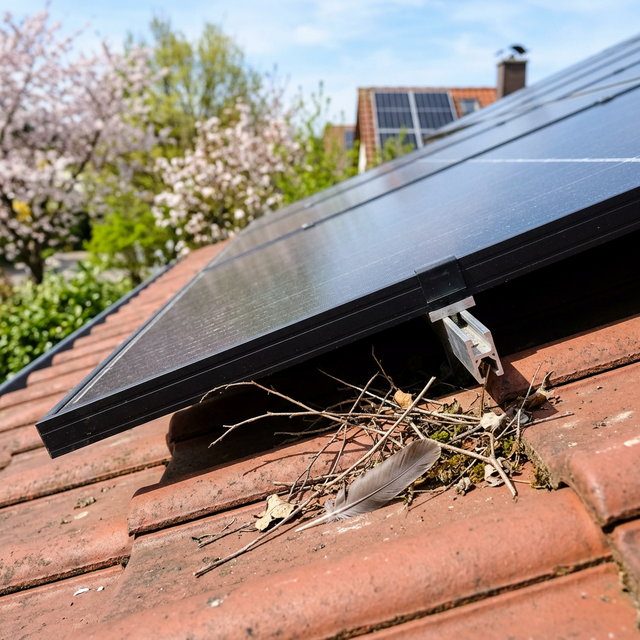
Bird nesting under PV modules is a frequent cause of cable damage and ventilation blockage. During visual inspection, check for droppings patterns, nesting material, and mesh displacement. Systems without perimeter protection require special attention to the module underside — a process that adds 15–20 minutes per array to inspection time.
2. Performance Monitoring
Yield analysis detects problems that visual inspection misses. Most inverters provide production data, but interpreting that data requires comparison against expected output.
Key performance indicators:
- Daily kWh vs. irradiance baseline — consistent underperformance suggests soiling, shading, or electrical faults - String-level mismatch — one underperforming string indicates module degradation or bypass diode failure - Peak power deviation — a drop in peak output (typically noon ±2 hours) signals soiling or cell damage - Temperature coefficient adherence — excessive output loss on hot days suggests poor ventilation
Commercial-scale systems benefit from real-time monitoring with alert thresholds. Residential systems typically require manual quarterly checks via inverter display or app.
<!-- IMAGE: slot=section hint="inverter display showing performance data, monitoring equipment" -->
3. Cleaning and Soiling Management
Soiling losses vary dramatically by location. Coastal installations face salt spray; agricultural areas accumulate dust and pollen; urban rooftops collect particulate matter and bird droppings.
Cleaning frequency should be data-driven, not calendar-based. If performance monitoring shows >3% soiling loss, cleaning is justified. For most European climates, annual or bi-annual cleaning suffices unless bird activity accelerates soiling.
Cleaning protocol:
1. Use deionised water to avoid mineral deposits 2. Soft brushes or microfibre applicators only — no abrasive pads 3. Work during low-irradiance hours (early morning) to prevent thermal stress 4. Rinse from top to bottom following natural drainage 5. Document cleaning date and performance improvement
Bird protection systems reduce cleaning frequency by eliminating droppings under modules and preventing debris accumulation. Installers report 40–60% reduction in annual cleaning requirements on protected arrays.
4. Electrical Testing
Beyond visual and performance checks, periodic electrical testing verifies system safety and compliance.
Annual electrical inspection should include:
- Insulation resistance testing (IEC 62446-1) — detects cable degradation - Earth continuity — confirms protective bonding integrity - String voltage measurement — identifies cell failures or bypass issues - Inverter functional test — error log review, MPPT behaviour, grid sync
For commercial systems, thermographic inspection is recommended every 2–3 years to detect hot spots invisible to visual assessment. This identifies failing bypass diodes, module cell cracks, and poor electrical connections before they escalate.
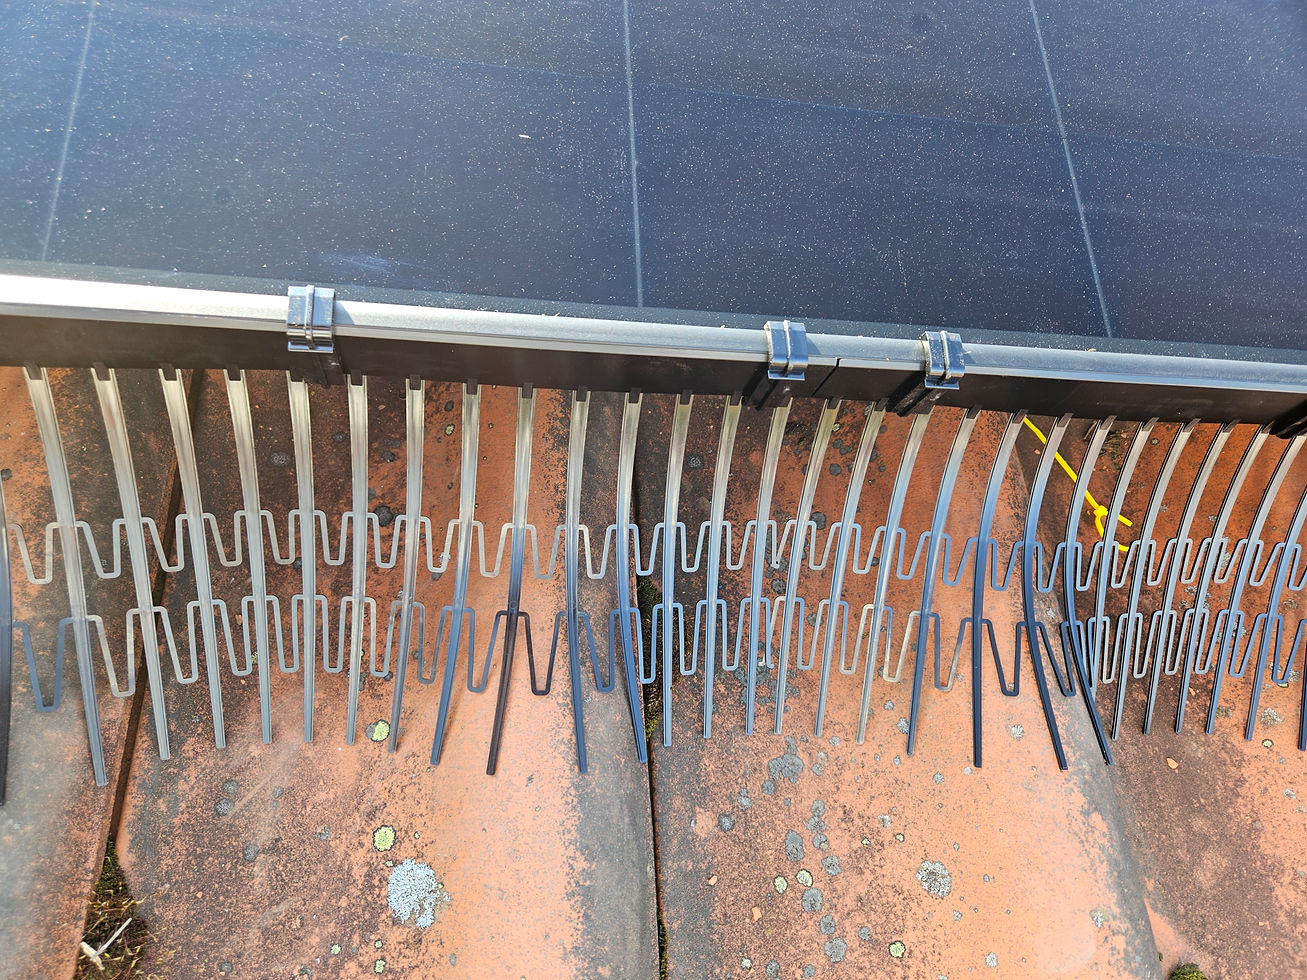
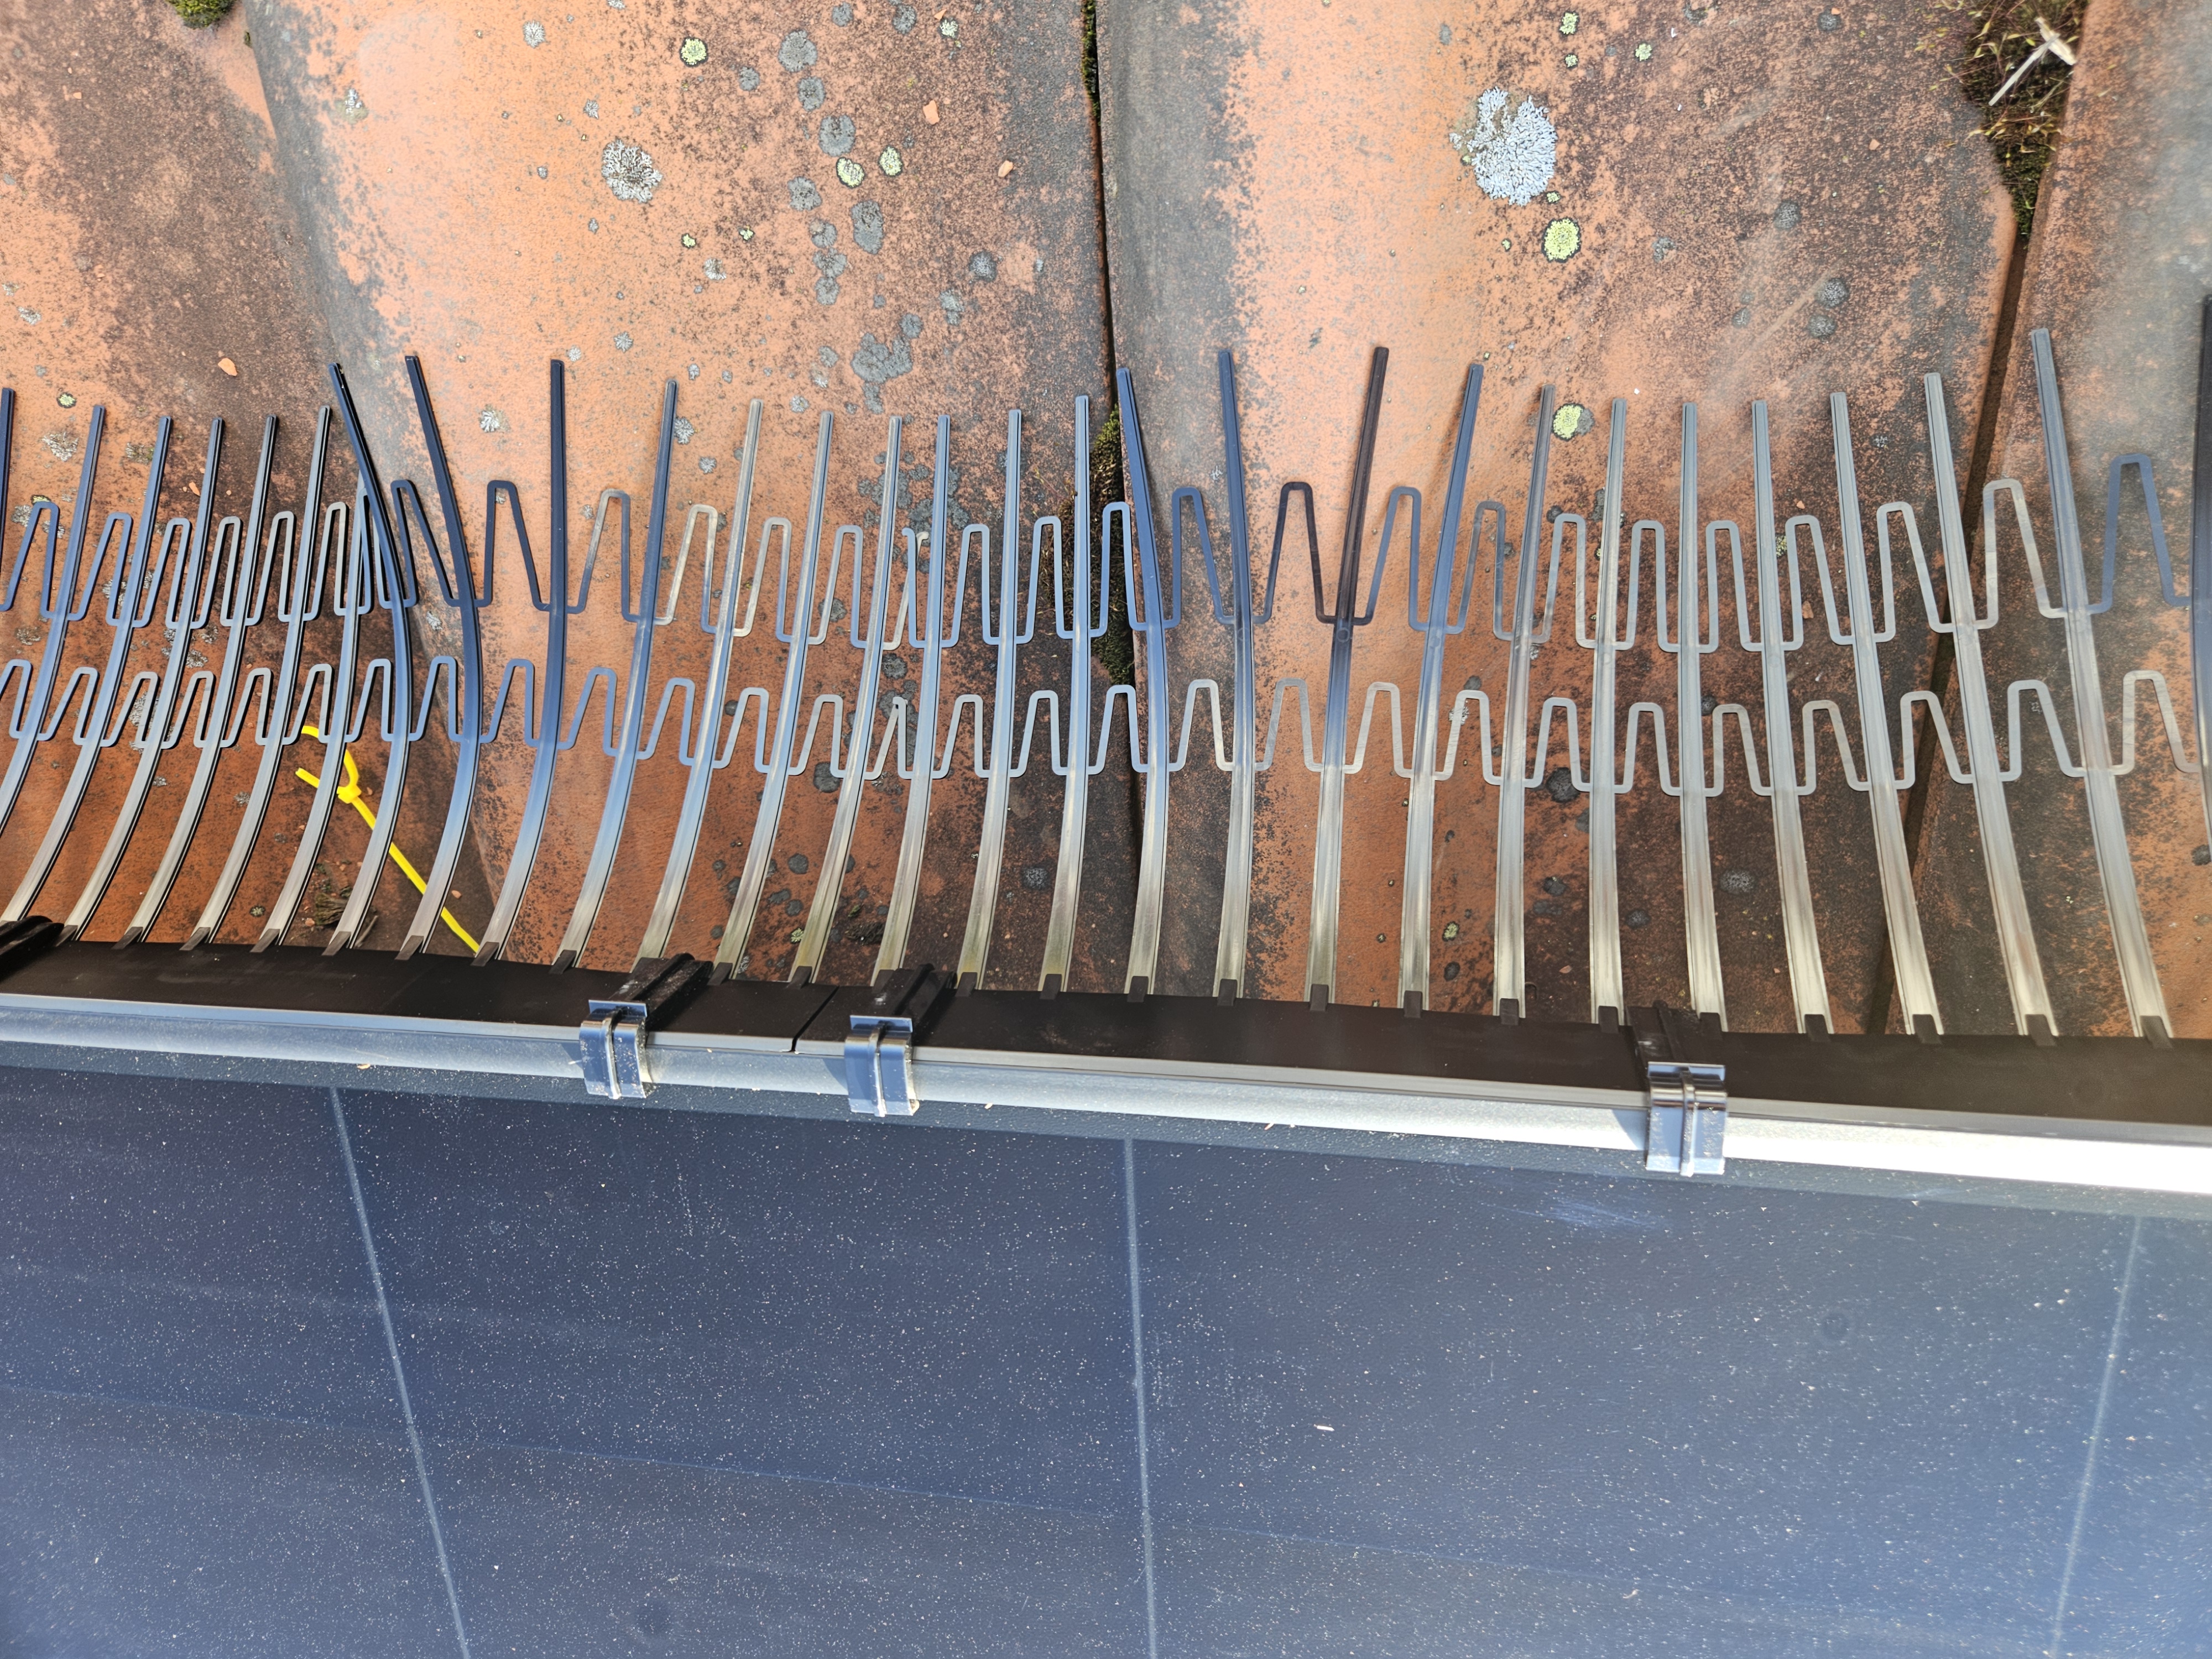
5. Bird and Pest Protection Inspection
Bird nesting under PV modules is the leading cause of preventable cable damage on pitched-roof installations. Nest material retains moisture, leading to insulation breakdown and potential arc faults.
Inspection checklist for bird protection:
- Mesh segment continuity around full perimeter - C-clip engagement on all frame heights (30 / 35 / 40 mm variants) - Cable tie integrity at segment connections - Mesh tension — sagging indicates displacement or poor initial installation - Evidence of attempted breaches (droppings pattern analysis)
Systems installed without perimeter protection require underside inspection annually. This involves roof access, lifting module edges, and removing nesting material — a process that carries both safety risk and labour cost.
Recommended Maintenance Schedule
**Residential (<10 kWp)**: Visual Inspection: Every 6 months | Performance Review: Quarterly | Professional Cleaning: Annually or as needed | Electrical Testing: Every 2 years | Bird Protection Check: Every 6 months
**Small Commercial (10–100 kWp)**: Visual Inspection: Quarterly | Performance Review: Monthly | Professional Cleaning: Bi-annually | Electrical Testing: Annually | Bird Protection Check: Quarterly
**Large Commercial (>100 kWp)**: Visual Inspection: Monthly | Performance Review: Continuous monitoring | Professional Cleaning: As data indicates | Electrical Testing: Annually | Bird Protection Check: Quarterly
Adjust frequency based on environment. Coastal, agricultural, and high-bird-activity locations require more frequent attention.
<!-- IMAGE: slot=section hint="seasonal maintenance calendar, inspection schedule chart" -->
Common Maintenance Mistakes
Mistake 1: Waiting for Performance Loss Before Acting
By the time yield drops noticeably, damage has often progressed beyond simple correction. A 5% output loss may represent months of soiling, partial shading from vegetation growth, or advanced cable degradation.
Mistake 2: Ignoring Module Underside
The top surface is visible from ground level. Cable abrasion, nest accumulation, and moisture ingress occur underneath — invisible unless inspected from the roof.
Mistake 3: Using High-Pressure Washers
Tempting for speed, but high-pressure water forces moisture into junction boxes, delaminates cell layers, and damages anti-reflective coatings. Soft brush and low-pressure rinse only.
Mistake 4: Delaying Bird Protection Until Nesting Occurs
Once birds establish a nest site, they return annually. Retrofitting protection after nesting begins requires nest removal (legally restricted during breeding season in many jurisdictions), cleaning, cable inspection, and then installation. Specifying protection at commissioning avoids this cascade entirely.
Mistake 5: No Documentation
Undocumented maintenance voids warranty claims and provides no defence against liability. Photograph before/after conditions, log inspection dates, record performance data. A simple maintenance log template protects both installer and client.
The Business Case for Maintenance Contracts
For installers, O&M contracts convert one-time installation revenue into recurring income. A typical annual maintenance contract for a 30 kWp commercial system includes:
- 2 visual inspections - 1 professional cleaning - Performance data review with quarterly reporting - Bird protection inspection and minor repairs - Priority callback response
This generates predictable annual revenue per system with minimal marginal cost once a regional service route is established. Over 10 years, O&M revenue can exceed initial installation margin.
Clients value predictability. Fixed-price maintenance contracts eliminate surprise repair costs and preserve system performance warranty compliance.
Integration with Bird Protection Systems
Bird protection is not a separate accessory — it is a core component of system longevity. Mesh perimeter protection delivers:
- Zero cable abrasion from nesting material - Reduced cleaning frequency by 40–60% - No moisture retention under modules - Simplified inspection — no underside access required - Fire risk mitigation — no debris accumulation
Systems installed with PV Protector® perimeter protection show measurably lower O&M costs. The 10-year service life of UV-stabilised HDPE mesh aligns with the first major maintenance cycle, making it a cost-neutral addition when annualised.
<!-- IMAGE: slot=section hint="bird protection mesh installed on solar array, maintenance-free perimeter" -->
Further Reading: PV Maintenance & Inspection Topics
This pillar page provides the strategic framework for PV system maintenance. For specific procedures and detailed guidance, explore these cluster articles:
- How Often Should Solar Panels Be Inspected? A Practical Guide - How to Identify Bird Damage During a PV System Inspection - How Bird Protection Makes Solar Panel Cleaning Easier - Solar O&M Cost Benchmarking: Why Bird Protection Matters - Seasonal Bird Activity and Solar Maintenance Planning - Debris Under Solar Panels: The Hidden Risk
Additional topics in this cluster cover thermographic inspection, maintenance log templates, cable inspection protocols, and insurance-compliant documentation.
Building a Maintenance Culture
The best maintenance programmes are proactive, not reactive. For installers, this means:
1. Educating clients during commissioning about inspection schedules and performance expectations 2. Providing a simple maintenance checklist that system owners can reference 3. Offering annual service contracts at the point of installation 4. Documenting every site visit with photos and performance data 5. Building regional service routes that reduce travel time per system
PV system maintenance is not an afterthought — it is the foundation of long-term client relationships and predictable business revenue.
About PV Protector®
PV Protector® is a tool-free perimeter protection system for pitched-roof photovoltaic installations. Designed and manufactured in Germany, it prevents bird nesting and cable damage while reducing long-term maintenance costs. The system uses UV-stabilised HDPE mesh segments secured with C-clips compatible with 30 / 35 / 40 mm module frames. No drilling, no adhesive, no frame modification required.
Warranty: 10 years. Design life: ≥10 years under European UV and weather exposure.
Manufactured by Pyramidi GmbH, Leonberg, Germany.
Comments